
DIY Photography: Tips on How to Create Your Own Photographs
April 15, 2014

CONSUME CREATIVELY
This content is available in:
This content is available in:
TEXT
So, we’ve discussed what to look for when searching for people stock photography and if you’ve hired a professional photographer how to best utilize the time. But what if those options aren’t right for you?
Taking your own company photos may seem like a daunting task but it is possible to get decent photographs with your typical point-and-shoot camera. If you’re going to be doing your own photography take advantage of using your real environment. Even if your office is more modestly decorated, it’s possible to get great results with minimal decoration. Here are a few tricks to keep in mind when you’re needing company photography on a tight budget.
1. Create a Checklist
Ponder a moment what sort of pictures you’d like to create. Make a list of your ideas, locations and people who you’d like to photograph. (Don’t forget to make sure you let your subjects know when the photography day is so they are prepared!)
If you’re feeling nervous about taking your own photographs take some time and test out your ideas. Go to the different locations you’d like to use and take some test shots. Getting some practice in will make you feel much more comfortable when the time comes to actually photograph your subjects. The test photos also act as a little list in your camera of specific spots you’d like to place your subjects.

This photo of Jeremy was taken with my iPhone, on a rainy day, even!
2. Find the Light
Take a day, or so, to notice the light around your office. Which room has the best light? What time of day is the room best illuminated with natural light? Turn off your camera’s flash option and experiment just using the natural window light. As illustrated in this picture of Jeremy, natural light provides a soft, smooth highlight. Avoid the use of flash if at all possible.
3. Clean and Set Up Your Space
The first thing a pro will notice, when setting up a shot, is the objects within the shot. Wherever you’re going to be photographing neaten the space. Move piles of paper, straighten magazines or books and put away that candy bowl.
Your subject is your main focus. As an example, let’s say you’re going to photograph your staff seated in a office chair next to a desk. Avoid unnecessary items on the desk. Instead of including a monitor, pen cup, books and a stack of papers, clear all those things away and just feature the person.
4. Use Neutral Walls for Backgrounds
It’s great if you office has white, or off white, colored walls, but not every office does. Prepare ahead with a simple solution: find a large piece of white paper (great for head-shots), or purchase an inexpensive white sheet. Make sure to iron out all of the fold wrinkles, then you’ll have a perfect white backdrop for your head-shot portraits!
The closer your subject is to the background, the harsher the shadows on the wall will be. Have your subject move a foot or two away from the wall to ensure less shadows.
5. Enjoy the Great Outdoors
When capturing head-shots outside, props aren’t even necessary. Just find a nice, subtle, even light.
Since you’re own your own time, mix up your locations. Step outside your office building and check out your surroundings. A photograph of someone leaning in doorway or against a tree always looks nice.
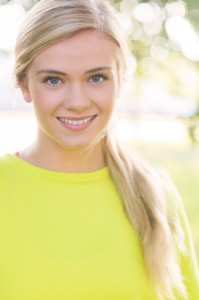
If you are going to venture outside keep in mind sunny days will produce SUPER bright highlights, so reserve your outside shots on days that are partly cloudy or overcast. When capturing head-shots outside props aren’t even necessary. To keep the background neutral, and blurred out like in this example, have your subject stand a distance away from any objects. This will keep your background unobtrusive allowing the person to be the main focus of the photograph.
6. Take More Than One
It may seem excessive to keep shooting after you’re sure you’ve got “the one,” but take a few more shots. It can’t hurt. Move around your subject, check out different angles.
Don’t be afraid to think outside the box. You may not use that image you captured while holding your camera diagonally, or it may end up the most awesome image you shot!
Who Manifested This Madness?

This fabulous human, that's who.
Monica Maye Pitts
Monica is the creative force and founder of MayeCreate. She has a Bachelor of Science in Agriculture with an emphasis in Economics, Education and Plant Science from the University of Missouri. Monica possesses a rare combination of design savvy and technological know-how. Her clients know this quite well. Her passion for making friends and helping businesses grow gives her the skills she needs to make sure that each client, or friend, gets the attention and service he or she deserves.